UV DTF transfers at home have the power to elevate your tees, bags, and gifts with bright color, crisp detailing, and lasting adhesion, letting you bypass the expense, lead times, and design constraints of commercial shops while enjoying the creative control and satisfaction that comes with doing it yourself. This beginner-friendly, descriptive guide walks you through a practical setup, from choosing gear such as a UV-capable printer, transfer film, white underprint, and a reliable heat source, to optimizing color management, ensuring even curing, and applying finishing touches like protective coatings and proper washing tests. You’ll learn how to design for transfer, prepare materials, and optimize color so designs pop on both light and dark fabrics, including considerations for image resolution, mirroring when required, masking, and aligning artwork to avoid misregistration while minimizing waste. With a consistent, repeatable workflow, you can produce professional-looking outcomes while avoiding costly mistakes, enabling you to experiment with small runs for events, clubs, or personalized gifts, and to scale up as demand grows without compromising quality or comfort. By following safety guidelines, maintaining clean workspaces, calibrating printers and heat presses, and keeping a log of successful settings, you’ll gain confidence to iterate, troubleshoot, and expand your at-home UV printing into reliable, repeatable projects that deliver consistent results across fabrics and inks.
Viewed through an alternative lens, at-home UV-curable garment transfers function as a DIY printing workflow that blends desktop design with heat-press artistry. Think of home-based image transfer as using UV inks on a film carrier, enabling bold, photo-like graphics on fabric without a commercial setup. Other terms you might encounter include in-house transfer printing, small-batch UV color transfers, and on-demand textile graphics produced with UV-curable media. This LSI-informed framing helps search engines connect related concepts—such as at-home UV transfer projects and wearable graphics—while keeping language accessible to makers and buyers.
Getting Started: Essential Gear for DIY UV DTF Transfers
To begin DIY UV DTF transfers, assemble a reliable home setup that minimizes guesswork and maximizes consistency. The core is a UV-capable printer or a standard printer paired with UV-curable inks, plus a compatible DTF transfer film and a white underprint layer to ensure vibrant color on dark fabrics.
Safety and workflow matter as much as equipment. Use a heat press with stable temperature and even pressure, protect the garment with teflon sheets, and maintain a clean, dust-free workspace. Regular cleaning of the print head and workstation helps maintain transfer quality across DIY UV DTF transfers.
Design and Preparation: How to Make UV DTF Transfers
Designing for success starts with high-resolution artwork (300–600 DPI) and a clear plan for underprinting on dark fabrics. Prepare artwork in a print-ready color profile that matches your transfer film and ink system, and decide if a mirror image is necessary.
Organize your layers so you can adjust elements without redoing the whole file. This is a practical guide for how to make UV DTF transfers efficiently, keeping your colors consistent and your design ready for printing.
Printing on Transfer Film: From Design to Film
Prepare the printer, film, and layout, loading the transfer film correctly and aligning with crop marks. Do a small test print on plain paper to verify layout, color balance, and margins before committing to the film.
Print the design onto the transfer film, starting with the white underprint if needed, followed by color layers. Let the ink cure briefly per the manufacturer’s instructions, then inspect the print for edge definition and color accuracy before moving on to pressing. This step is part of the DTF transfers at home step-by-step workflow.
Pressing, Curing, and Finishing: Durable Results with UV DTF transfers at home
Position the transfer on the garment and secure it to prevent shifting. Preheat the fabric surface briefly, place a teflon sheet, and apply your heat press at the recommended temperature, pressure, and dwell time for your film and fabric combination.
After pressing, follow the recommended peel method and allow the design to cure fully. Finishing steps may include a light post-press with a protective sheet and a few seconds at lower temperature to lock in adhesion, ensuring durable results with UV DTF transfers at home. This approach helps you achieve professional DTF transfers at home.
Troubleshooting and Quality Control for UV DTF Transfers
Common issues include faded colors, halos around edges, and edge lifting. Recheck color management, ensure proper white underprint for dark fabrics, and verify alignment and print density. If you’re troubleshooting UV DTF transfers at home, these checks are essential.
For stubborn problems like cracking or sticking after washing, revisit heat settings, time, and pressure, and confirm that the garment has fully cured before washing. Ensure your transfer film is compatible with the fabric and ink system to avoid future breakdowns.
Care, Maintenance, and Longevity for Your UV DTF Transfers at Home
Care for finished garments by following fabric labels, avoiding hot washes, and using mild detergents during the initial wash cycles. Proper storage helps maintain transfer integrity and prevents creasing that can distort the image.
Maintain your equipment with routine cleaning, platen care on the heat press, and proper storage of transfer films and inks. Document successful settings and outcomes so you can reproduce professional results at home for future projects, and keep UV DTF transfers at home in good condition through regular maintenance.
Frequently Asked Questions
What are UV DTF transfers at home and how can I start with DIY UV DTF transfers?
UV DTF transfers at home involve printing designs with UV-curable inks onto a transfer film, then applying the design to fabric with heat and pressure. They deliver bright color, sharp detail, and durable adhesion for small batches or personalized gifts. To start with DIY UV DTF transfers, gather a UV-capable printer, DTF transfer film with white underprint, an appropriate adhesive process, a heat press, and the necessary safety and finishing supplies, then follow a repeatable workflow.
What equipment do I need for UV DTF transfers at home?
For UV DTF transfers at home, you’ll need a UV-capable printer or printer with UV-curable inks, DTF transfer film and white underprint materials, an adhesive or curing method, a heat press, protective sheets, garments in suitable fabrics, design software with color management, and cleaning supplies to maintain quality and consistency.
How to make UV DTF transfers at home: a step-by-step overview?
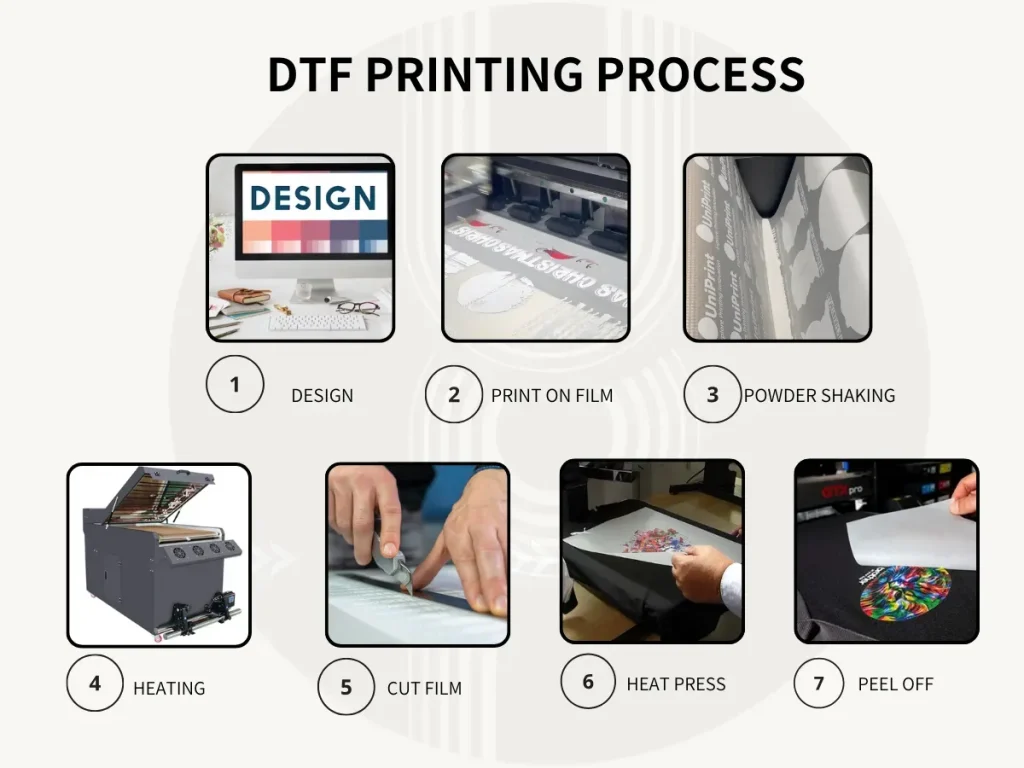
Here’s a concise overview: design your artwork with a white underprint if needed, prepare and test print settings, print the transfer film, cure or bake the print as required, prepare the garment, position the transfer, press at the recommended temperature and time, peel as directed (hot or cold), and finally cure and care for the finished product. This mirrors the core process of UV DTF transfers at home.
What are common issues when doing DTF transfers at home step-by-step, and how can I troubleshoot?
Common issues include faded colors or dulls, white halos or color bleed at edges, peeling after washing, and a sticky or stiff feel. Troubleshoot by checking color management and white underprint usage, ensuring precise alignment and high-resolution printing, verifying cure time and temperature, and adjusting post-press conditioning or washing recommendations. These steps are typical for successful DTF transfers at home step-by-step.
How do I ensure durability and wash-fastness for UV DTF transfers at home?
Ensure durability by fully curing the adhesive or film, using correct heat press settings, and allowing the transfer to cure before washing. Wash garments per fabric care instructions, preferably inside out and with mild detergents. Testing a sample garment helps verify colorfastness and longevity for UV DTF transfers at home.
How can I optimize color and achieve professional-looking results with UV DTF transfers at home?
Optimize color by calibrating your printer, managing color profiles, and using a white underprint for dark fabrics. Choose quality garments and maintain a clean, repeatable workflow with documented settings. These practices help you achieve more professional DTF transfers at home and maintain consistency across projects.
| Key Point | Summary |
|---|---|
| What are UV DTF transfers at home? | UV DTF transfers involve printing designs with UV-curable inks onto a transfer film, then applying the design to fabric with heat and pressure. When done correctly, the result resembles a commercial transfer with bright color, sharp detail, and lasting adhesion. Ideal for small batches, trial runs, or customized apparel for events, teams, or brands. |
| Ideal uses | Best suited for small batches, trial runs, or customized apparel for events, teams, or brands. Enables personal or limited-edition designs without full-scale production. |
| What you’ll learn in this guide | A clear, repeatable process for creating UV DTF transfers at home; how to prepare designs, select materials, and optimize color; step-by-step printing, curing, pressing, and finishing; and troubleshooting tips to fix common issues. |
| Getting started: essential gear and materials | – UV-capable printer or printer with UV-curable inks – DTF transfer film and white underprint material – Adhesive or curing method (powder-based or UV-cure) – Heat press – Teflon sheet or silicone mat, parchment paper, protective press cover – Garments and fabrics (cotton blends, poly blends, dark fabrics) – Design software and color management tools – Cleaning and maintenance supplies (isopropyl alcohol, lint-free wipes, microfiber cloth) |
| Note on safety and setup | Follow manufacturer guidelines for your printer, inks, and film. Work in a well-ventilated area and use protective gear as required. Maintain a safe, controlled environment for consistent, durable results. |
| Step-by-step: from design to finished transfer | A structured workflow moving from concept to outcome, covering design, printing, curing, pressing, finishing, and quality checks. |
| 1) Design and prepare your artwork | Use high-resolution artwork (300–600 DPI). Plan for a white underprint for dark fabrics, convert colors to a print-ready profile, and create a mirror image if needed. Save layered files for easy editing. |
| 2) Prepare the printing setup | Load transfer film, verify alignment marks and crop settings, run a test print on plain paper, and ensure the white underprint prints in the correct layer if used. |
| 3) Print on the transfer film | Print the design onto the film with UV inks. If using a white underprint, print that layer first, then color layers. Let the film cure briefly if required by ink. Inspect for color accuracy and edges. |
| 4) Apply adhesive or cure the film | If using adhesive powder, apply evenly and cure/bake to activate. If direct UV-curing is used, follow film/ink guidance for curing between printing and heating steps. Ensure powders are fully set before handling. |
| 5) Prepare the garment and heat source | Preheat garment surface to stabilize the base. Use a teflon sheet to protect the garment and a lint-free surface for placement. |
| 6) Position the transfer on the fabric | Place the transfer on the garment with the design aligned. Use weights or light tape to prevent shifting during pressing. |
| 7) Press the transfer | Close the heat press and apply temperature, pressure, and time per material guidelines (typical: 320–360°F/160–180°C for 12–20 seconds). Avoid moving the garment during pressing. |
| 8) Peel and cool | Peel hot, warm, or cold as specified by the film. If color bleed occurs, re-press with a protective sheet after cooling. |
| 9) Post-press care and finishing | Allow full cure, handle gently, test-wash a sample for durability, and consider a light post-press if texture is involved. |
| Quality control: troubleshooting common issues | Faded colors: check color management and underprint usage; edges: ensure alignment and print quality; peeling/cracking: verify heat/pressure/cure; sticky feel: review adhesive cure guidance. |
| Optimization tips for consistent results | Regular printer calibration, quality garments, clean workspace, repeatable workflow. Document your settings to reproduce successful transfers. |
| Protecting your UV DTF transfers at home: care and maintenance | Avoid harsh detergents and high-temperature washes initially; store garments flat or hung; keep heat press clean to avoid residue transfer. |
Summary
Concluding the key points: UV DTF transfers at home enable designers to achieve vibrant, durable results from a home setup by following a structured process—from design and material selection to printing, curing, pressing, and finishing. With careful gear selection, safety, and quality checks, you can reliably produce small runs or personalized items that rival professional outcomes.