DTF printing tutorial guides you through a practical, beginner-friendly journey into the vibrant world of DIY apparel design, where simple tools and patient experimentation can yield professional-looking results. From choosing the right DTF printer setup to understanding direct-to-film printing fundamentals, color management, and workflow rhythms, you’ll build a solid foundation that scales with your projects and broader opportunities. You’ll learn about selecting the right DTF inks and substrates, testing on multiple fabrics, and developing a repeatable process that minimizes waste and misprints. This introductory guide also integrates clear explanations of terminology, key variables like heat, pressure, and dwell time, and practical DTF transfer tips you can apply immediately. With actionable steps you can try at home or in a small studio, you’ll gain confidence moving from concept to finished transfer and building a reliable, repeatable workflow you can apply to future projects, especially when batches grow for your growing business.
A film-based garment transfer method relies on pigment inks printed onto a clear film, followed by an adhesive treatment and heat-activated bonding to textiles. Key terms to monitor include printer calibration, ink formulation, and substrate compatibility that drive consistency across light and dark fabrics. In practice, this workflow suits home studios and small shops, emphasizing stable heat transfer conditions and careful inspection of the film before pressing. To grow accuracy over time, track variables such as dwell time, temperature, and pressure, and consult transfer tips when adjusting different fabrics.
DTF Printing Essentials: Setting Up Your Workspace and Tools
A solid DTF printer setup and a clean, dedicated workspace are the foundation of reliable transfers. Understanding direct-to-film printing basics helps beginners avoid wasted ink and misfeeds, while a well-tuned heat press ensures consistent results. Investing in a stable setup reduces guesswork and speeds up early learning.
This initial phase emphasizes selecting the right film, adhesive powder, inks, and substrates, since hardware and materials drive repeatability. By prioritizing a clean workflow and proper DTF printer setup, you minimize errors and create a smoother path from design to transfer.
DTF Inks and Substrates: Selecting Materials for Colorful, Durable Transfers
DTF inks and substrates determine color brightness, wash durability, and fabric compatibility. Use water-based pigment inks designed for direct-to-film printing and test on cotton, blends, and both light and dark fabrics to understand opacity and underbase needs. Matching inks to substrates is key for reliable results across projects.
Keep a small library of substrates and coated fabrics to compare how inks behave on each surface. Document outcomes to guide future designs and maintain consistency across batches, especially when switching film, ink lots, or substrates.
DTF Printer Setup and Color Management: Achieving Consistent Results
Calibrate color profiles tailored to your film and inks; use RIP software or built-in color management tools to minimize shifts between runs. A solid DTF printer setup reduces color drift and improves reproducibility, making color decisions more predictable during production.
Testing with small prints lets you adjust density, saturation, and underbase requirements before committing to full designs. Keeping notes on printer settings helps you reproduce successful transfers across garments and fabrics, ensuring consistent color across batches.
DTF Transfer Tips: Getting Perfect Adhesion and Finishes
DTF transfer tips focus on adhesive powder application, curing, and precise transfer timing. Follow the manufacturer’s guidelines for powder application and curing to lock the ink to fabric during heat pressing, which improves durability and wash-fastness.
Control variables like temperature, dwell time, and pressure, and ensure the film is aligned. Proper technique reduces cracking, ghosting, and edge lift, particularly on textured fabrics and dark backgrounds, leading to cleaner, professional-looking transfers.
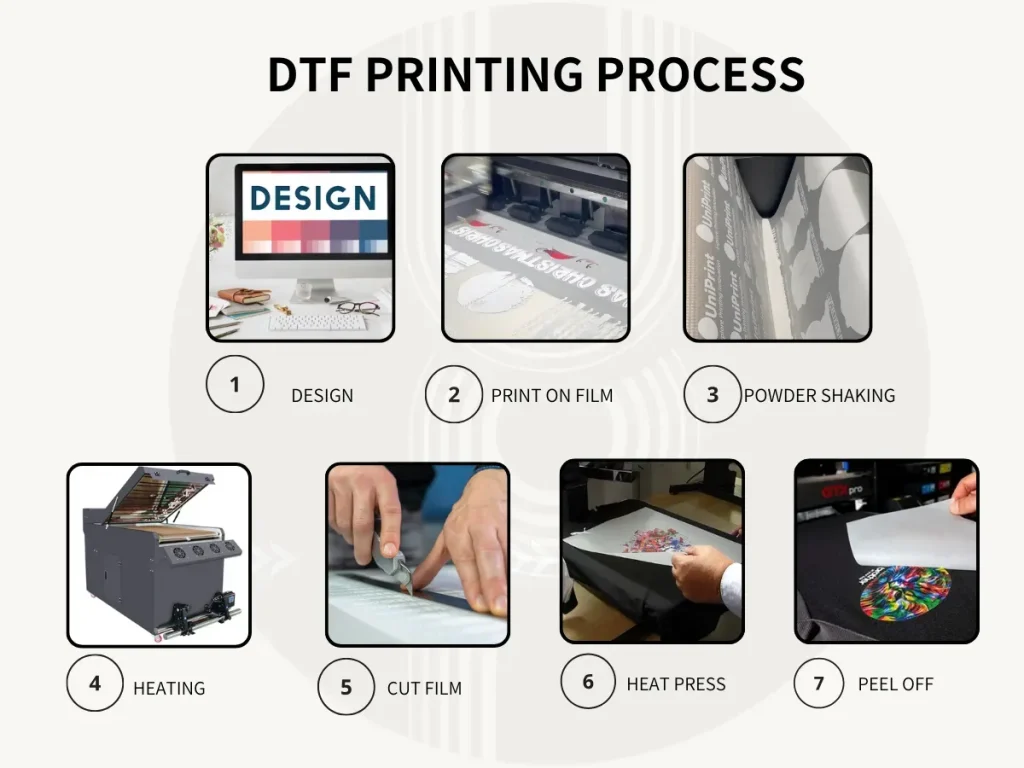
Direct-to-Film Printing Workflow: DTF printing tutorial for Beginners
Direct-to-film printing workflow covers design choices, layout, mirror preparation, and the path from digital art to film. This DTF printing tutorial approach emphasizes color management and repeatable steps to help beginners build confidence in every stage of the process.
From printing on film to applying adhesive powder and curing, the workflow stresses careful timing and thorough documentation. The completed film is then ready for transfer, creating a repeatable method that can scale from hobby projects to small-batch runs.
Maintenance and Troubleshooting for Reliable DTF Systems
Regular maintenance keeps your DTF printer setup performing at its best. Clean print heads and film guides, inspect and replace worn parts, and maintain a clean workspace to prevent color shifts or misfeeds that disrupt production.
After changes in ink lots, film batches, or firmware updates, recalibrate color profiles and run test prints. Keeping a log of settings and outcomes helps reproduce successful transfers and reduces downtime, supporting long-term reliability in DTF workflows.
Frequently Asked Questions
What is a DTF printing tutorial and what will I learn from it?
The DTF printing tutorial is a beginner‑friendly, step‑by‑step guide to direct‑to‑film printing. It covers the full workflow from design to transfer, including DTF printer setup, DTF inks and substrates, film and adhesive powder handling, color management, curing, and common troubleshooting. You’ll learn how to choose materials, set up your printer, manage colors, and perform reliable transfers. The tutorial emphasizes practical, real‑world tips to help beginners achieve professional results at home or in a small studio.
How do I get started with a solid DTF printer setup for reliable results?
Focus on DTF printer setup first: load pigment inks correctly, calibrate the color profile for your film, and ensure the film feeds cleanly with minimal jams. Run small test prints to verify color density and sharpness, and adjust printer settings as needed before committing to a full run. Keep the work area clean and aligned to reduce misprints and waste. A careful setup saves time and material in the long run.
What are the core steps in the direct-to-film printing workflow from design to transfer?
In direct-to-film printing, the core steps are: design and color management; printing on DTF film; applying adhesive powder and curing; transferring the design to fabric with heat and pressure; and post‑transfer checks. Each step builds on the previous to ensure color accuracy, durability, and proper adhesion. Proper drying before powder application and controlled curing are essential for a reliable transfer. Following the workflow helps beginners achieve consistent results.
How do I choose DTF inks and substrates for different fabrics?
DTF inks and substrates matter: use water‑based pigment inks designed for DTF and test across fabrics like cotton, blends, and both dark and light substrates. Start with a white underbase where needed to improve opacity on dark fabrics and adjust curing times per substrate. Keep a few test swatches to dial in color density and adhesion before a full run. This testing helps ensure reliable results across various garments.
What are some essential DTF transfer tips to improve transfer quality and durability?
Key DTF transfer tips include maintaining consistent temperature, pressure, and dwell time on the heat press; ensuring the film is properly aligned and dry before transfer; following manufacturer guidelines for curing temperature and time; and choosing the correct peel method (hot or cold) as advised. Keep the printed film clean and avoid smudging by allowing adequate drying before applying adhesive powder. Documenting settings for each material helps reproduce successful transfers.
What common issues might arise in a DTF printing tutorial and how can I troubleshoot them?
Common issues include faded colors, cracking or flaking transfers, lifting edges, and smudging. Troubleshoot by adjusting ink density and color profiles, verifying film compatibility, ensuring even adhesive powder application and proper curing, and checking heat press temperature and dwell time. Also confirm film alignment and printer feed accuracy, and run test prints on scrap garments to refine your settings before printing a full batch.
| Key Area | Summary |
|---|---|
| What is DTF printing? | Direct-to-film printing uses a clear transfer film, water-based pigment inks, adhesive powder, heat, and pressure to move designs onto fabrics; it offers vibrant color, broad fabric compatibility, and is beginner-friendly. |
| Why DTF is beginner-friendly? | Emphasizes a practical workflow, clear steps, and manageable equipment with relatively low upfront costs compared with other methods. |
| What you’ll need (materials & equipment)? | DTF printer with pigment inks and color management; DTF film and adhesive powder; inks and substrates; heat press with temperature/pressure controls; curing/drying tools. |
| Printer setup basics | Load inks correctly, calibrate color profiles for the film, ensure smooth film feeding, and run test prints to minimize color shifts and misprints. |
| Step 1 – Design & color management | Use vector or high-res designs; consider a white underbase where needed; mirror the image for transfer. |
| Step 2 – Printing on DTF film | Load film, match print settings to film type, monitor ink usage, verify density and sharpness, and allow the film to dry briefly. |
| Step 3 – Apply adhesive powder & cure | Evenly apply adhesive powder, then cure/dry per manufacturer instructions; inspect for clumps or residue. |
| Step 4 – Transfer to fabric | Place printed/cured film adhesive-side-down on fabric, apply heat and pressure (160–180C / 320–356F for 15–30s), then peel per process (cold or hot). |
| Step 5 – Post-transfer checks | Inspect for incomplete areas or misalignment; re-press if needed; allow to cool completely. |
| Step 6 – Care & maintenance | Wash inside-out in cold water, air-dry or use low heat; regularly clean equipment and check components. |
| Common issues & troubleshooting | Faded colors (adjust density/profiles); cracked transfers (check cure); lifting edges (verify pressure/alignment); smudging (adequate drying time and cure). |
| Fabric/substrate compatibility | Test on new fabrics; DTF works on cotton, blends, polyesters; adjust underbase and curing per substrate. |
| Maintenance for equipment | Clean print heads/guides, replace worn parts, recalibrate color after changes, keep workspace dust-free. |
| Practical project ideas | Small tee runs; multi-layer designs; test on light and dark fabrics; seasonal items to build a portfolio. |
Summary
DTF printing tutorial provides a practical, beginner-friendly path to mastering direct-to-film transfers. This descriptive conclusion reinforces a repeatable workflow built on a reliable printer setup, quality materials (DTF inks and substrates, adhesive powder, film), careful color management, and methodical transfer steps. With experience, you can expand to additional fabrics and more complex designs while maintaining consistency and durability, turning digital artwork into finished garments you’re proud to wear or sell.